viaSocket AI Agents built-in tool move beyond traditional workflows by leveraging natural language instructions and AI decision-making. Instead of rigid branches, you define:
A trigger
AI-driven instructions (written in plain English)
Connected data sources
Automated actions across ~1,500 integrations
This makes the agent adaptive, scalable, and less reliant on hardcoded logic.
Why Use an AI Agent?
Here’s what you’ll love:
Smart & Adaptive: Understands the intent behind triggers and adapts its response.
Data-Aware: Can access and use your uploaded files, app data, and CRM info.
Multi-App Actions: Can create replies, update records, send messages, and more.
No Code: You don’t need to write scripts—just describe the behavior.
Step-by-Step Breakdown :
1. Starting with Templates or Scratch
Users can either use pre-built templates (like a "Support Email Agent") or build from scratch.
Triggers are selected from existing apps (e.g., Gmail, Outlook, HubSpot).
2. Insert Actions
Actions are what the agent does after understanding the situation.
Examples:
Draft an email
Send a Slack DM
Update a Google Sheet
Create a support ticket
3. Configure the viaSocket AI Agent
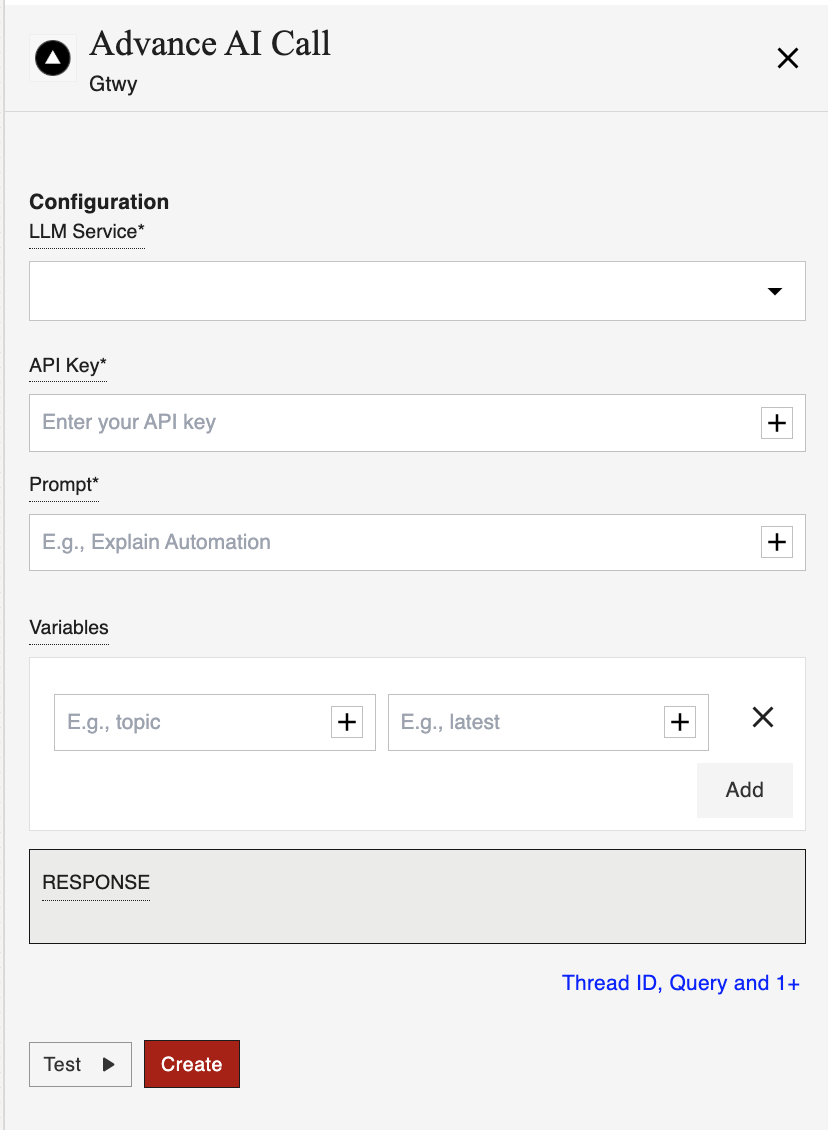
1. Select LLM Service
From the LLM Service dropdown:
Choose the AI provider you want to use (e.g., OpenAI, Google Gemini, Anthropic Claude).
This determines how your API call is routed.
2. Enter API Key
Paste your API Key securely into the field.
This key authenticates your request to the selected LLM.
💡 Tip: Use environment variables or secrets manager for sensitive keys.
3. Define Prompt
This is the core instruction to guide the AI’s behavior. Think of it like this:
Example instruction:
When I receive a new email, check if it’s a customer query. If it is, look up the answer in my “FAQ doc.” If you find an answer, draft a polite reply. Also, send a Slack message to @support with the draft.
More Examples:
Summarize the customer’s issue.Classify the query based on intent.Generate a response using FAQ data.
4. Optional: Thread ID
Use this field if:
You're maintaining conversational context over multiple calls.
You want the model to remember prior exchanges using thread/session IDs.
If not needed, you can leave it blank.
5. Optional: Query
You can pass a specific user input or question into this field—ideal when you're pulling dynamic values from previous steps.
Example:
What is the refund policy?
6. Add Variables (Dynamic Inputs)
These let you pass structured data or custom values into your prompt using variable references.
To add:
In the first field, enter the variable name (e.g.,
topic,user_email,customer_message)In the second field, enter the value (static or dynamic from a previous step)
Click Add
You can then use these inside your prompt like:
plaintextSummarize the following message: {{customer_message}}
7. Test the Agent
Before saving, click Test to:
Send a test call to your selected LLM
View the live RESPONSE from the model
Debug any prompt or variable issues
8. Create & Save
If the output looks correct:
Click the Create button to finalize the AI Agent block in your workflow.
Example Use Cases
Agent Name | What It Does |
|---|---|
SupportBot | Handles customer queries by scanning the FAQ doc, drafting email replies, and notifying support if unsure. |
Lead Classifier | Monitors incoming leads, checks for quality signals, categorizes the lead, and sends them to the sales pipeline. |
Invoice Follow-up Agent | Triggers when an overdue invoice is detected, drafts a follow-up email, and notifies finance. |
Job Applicant Screener | Reads job applications, checks qualifications, and either sends a thank-you email or routes to HR. |